Summary
- There are a number of easy ways to save battery life on your Windows 11 laptop.
- Changing your Power Mode to Best Power Efficiency while unplugged can make a huge difference.
- Turning off visual effects and lowering your refresh rate can also help extend your laptop’s battery life in a pinch.
If there’s one thing I worry about most when using my Windows 11 laptop, it is battery life. I’m often on the go, and finding a place to charge during the day isn’t always easy, especially for long enough to fully recharge my laptop. While battery life on Windows laptops has certainly improved over the years and is catching up to Apple’s MacBooks, it still falls short overall, unless you’re using a Snapdragon chipset.
Fortunately, if you have a Windows 11 laptop, you can easily adjust several settings to improve battery life, helping ensure it lasts long enough to meet your needs. None of these require third-party software, and they can all be changed within the Windows settings menu. While some options will have a more noticeable impact than others, they all help extend your battery life and can save you when you’re in a tight spot. Here are five Windows settings I use to help improve my laptop’s battery life, which I recommend you give a shot as well.
1
Switch your Power Mode
Adjust how much power your PC is using
If you know you’ll be in a situation where you can’t plug in your laptop for a while, changing the Power Mode is one of your best options to help improve battery life. Windows allows you to set two different power modes: one for when your laptop is plugged in and the other for when it’s on battery. You can find Power Mode under Settings > System > Power & battery.
From there, I recommend setting the Power Mode to Best Power Efficiency when your laptop is on battery and to Best Performance when plugged in (as seen in the image above).
By adjusting your Power Mode on Windows, you’re essentially instructing your laptop to be more mindful of how many CPU and GPU resources it uses while on battery. This can help improve battery life, and the performance difference isn’t that noticeable for productivity tasks, at least in my experience. By setting it to Best Performance while plugged in, the CPU and GPU will operate at their full capacity, which is what you want, especially when gaming or using demanding apps.
2
Lower your refresh rate and brightness
Brightness is one of the biggest battery drains
It’s well-known that one of the simplest ways to extend a laptop’s battery life is to reduce the screen brightness. You can do this manually, or you can go to Settings > System > Display > Brightness and enable the option for Windows to automatically adjust brightness based on the content you’re viewing while on battery to save power. I typically just let Windows adjust my brightness, as I find that easier and less noticeable.
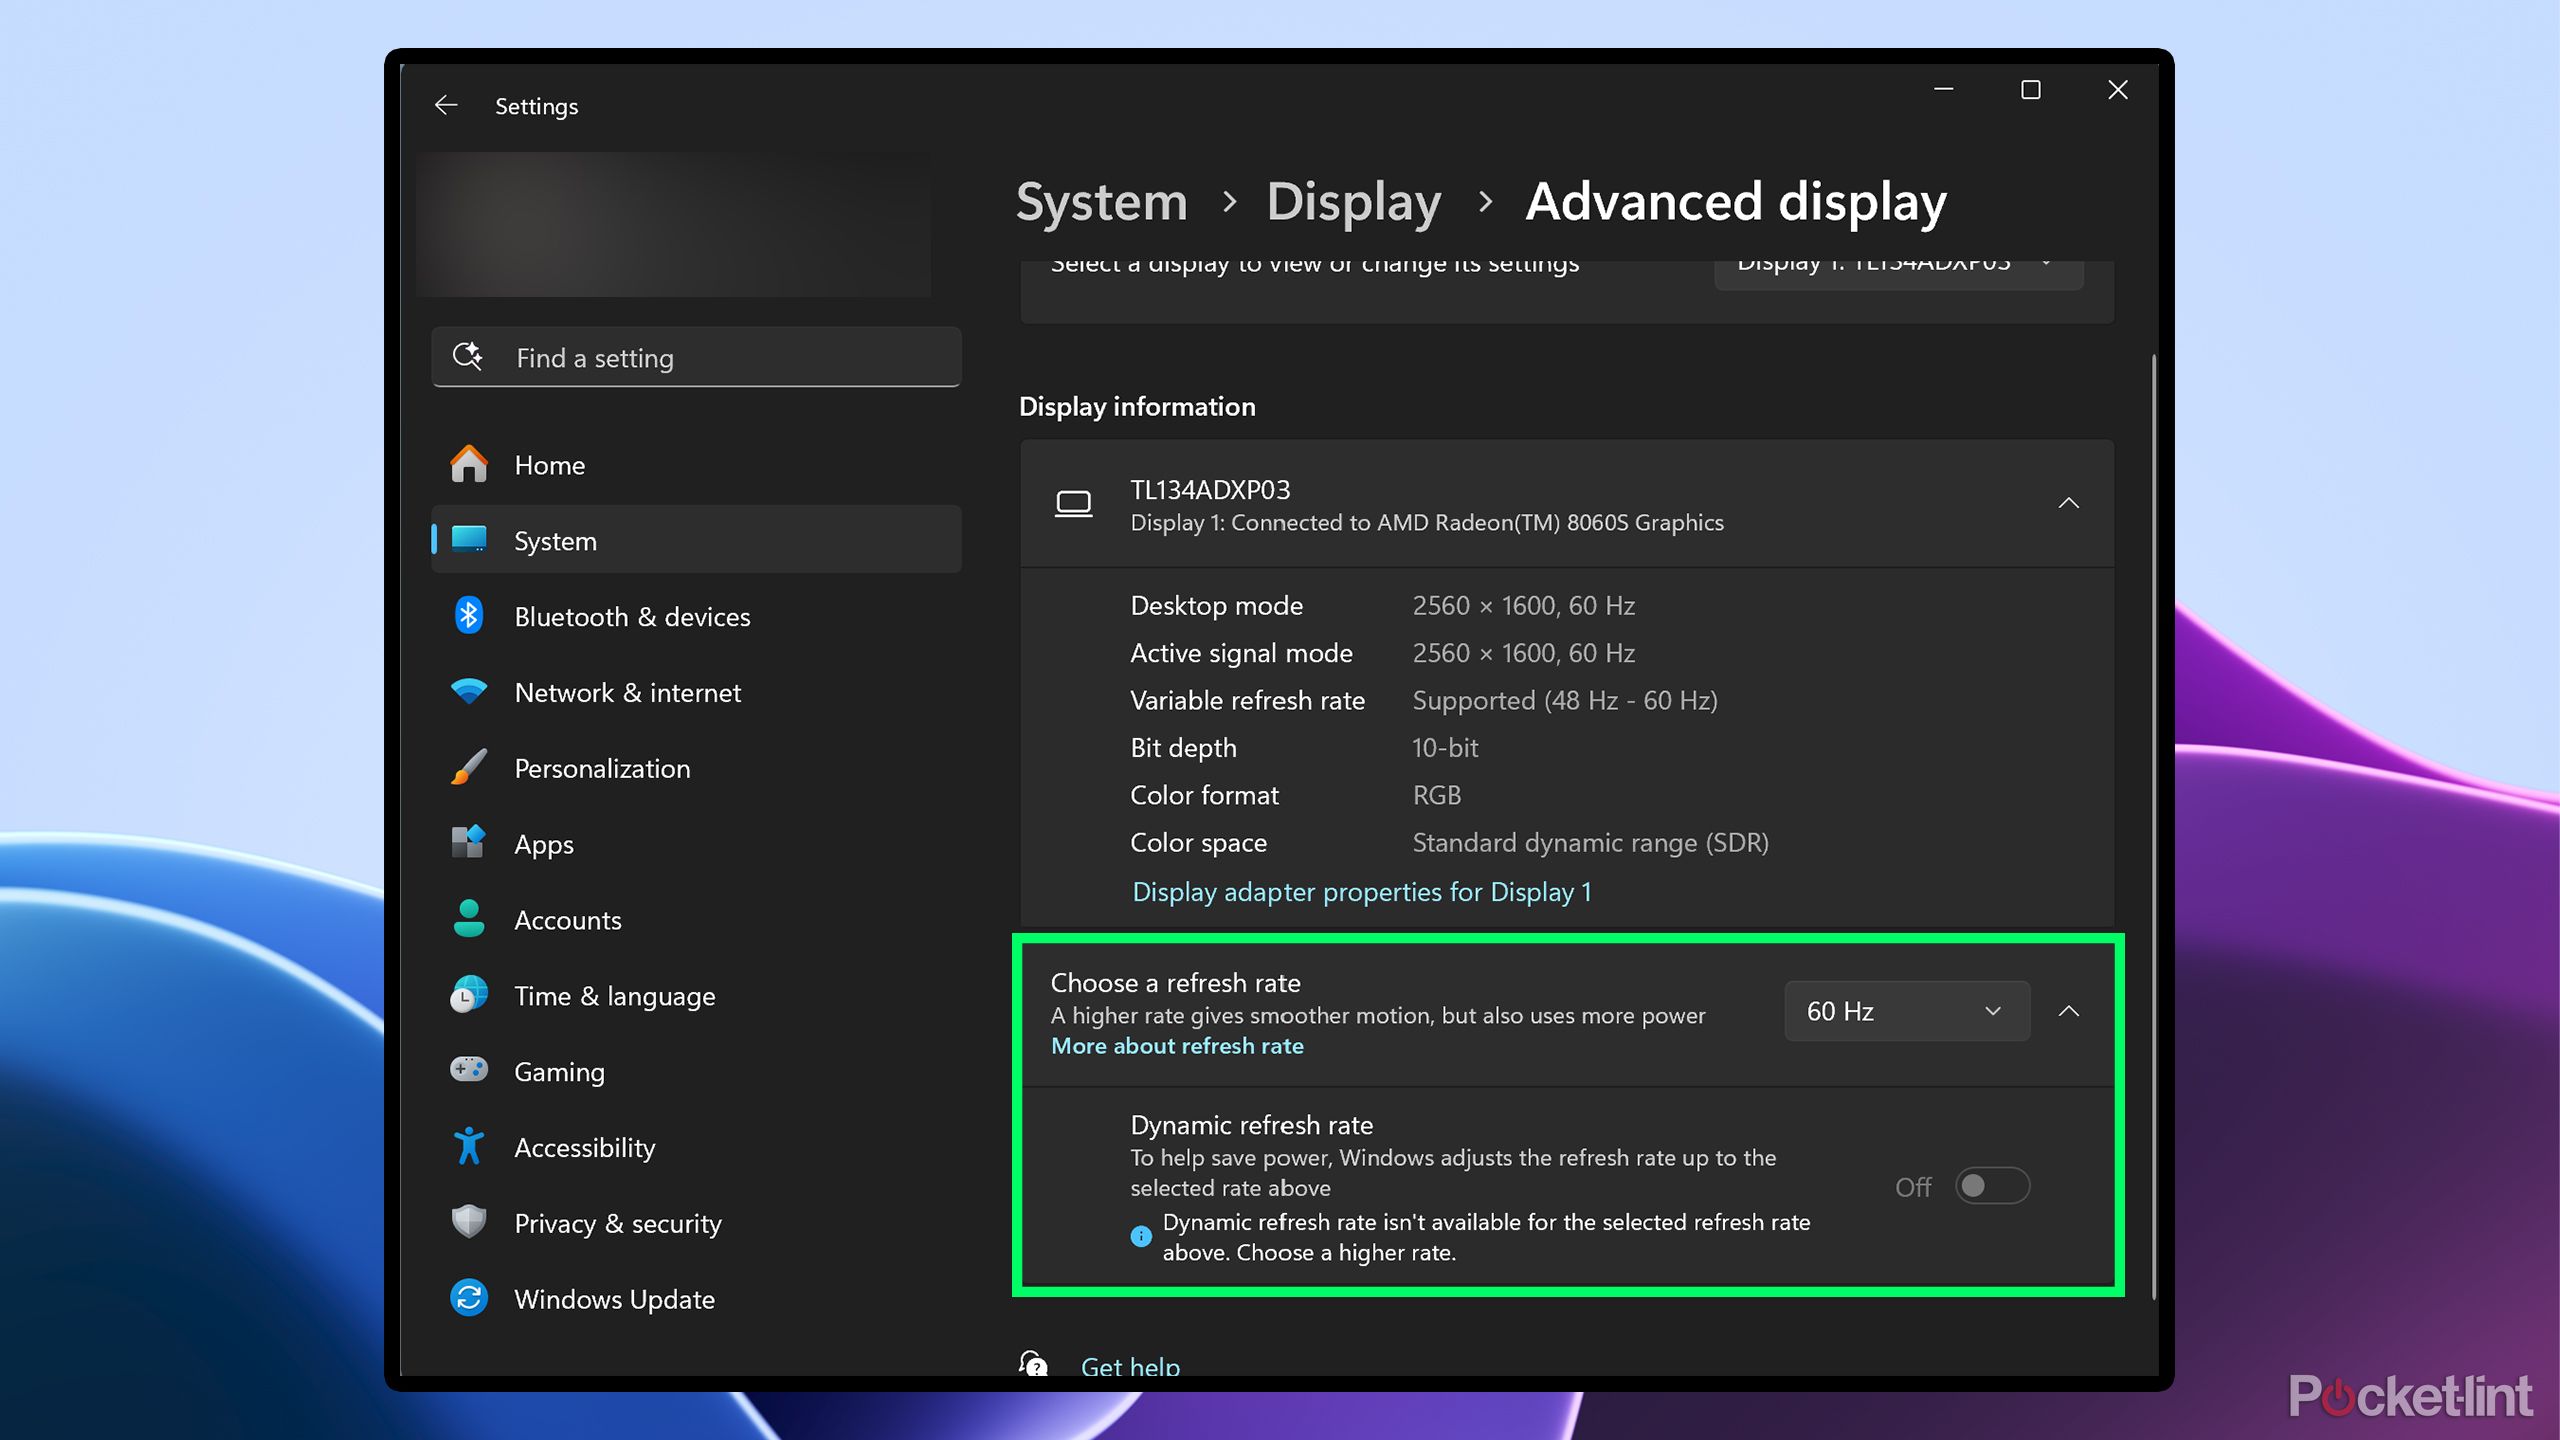
Another effective method is to lower your display’s refresh rate. If your laptop has a high refresh rate, consider reducing it to 60Hz when you’re in a pinch to conserve battery. I love my laptop’s 180Hz refresh rate, but if I need to save power, this is an easy sacrifice. Alternatively, you can enable Dynamic Refresh Rate (DRR), which automatically adjusts the refresh rate based on your activity. While it may not save as much power as manually lowering the refresh rate, it still provides some savings. You can adjust your refresh rate under Settings > System > Display > Advanced Display > Choose Refresh Rate.
3
Turn off visual effects
Save battery and make your PC more snappy
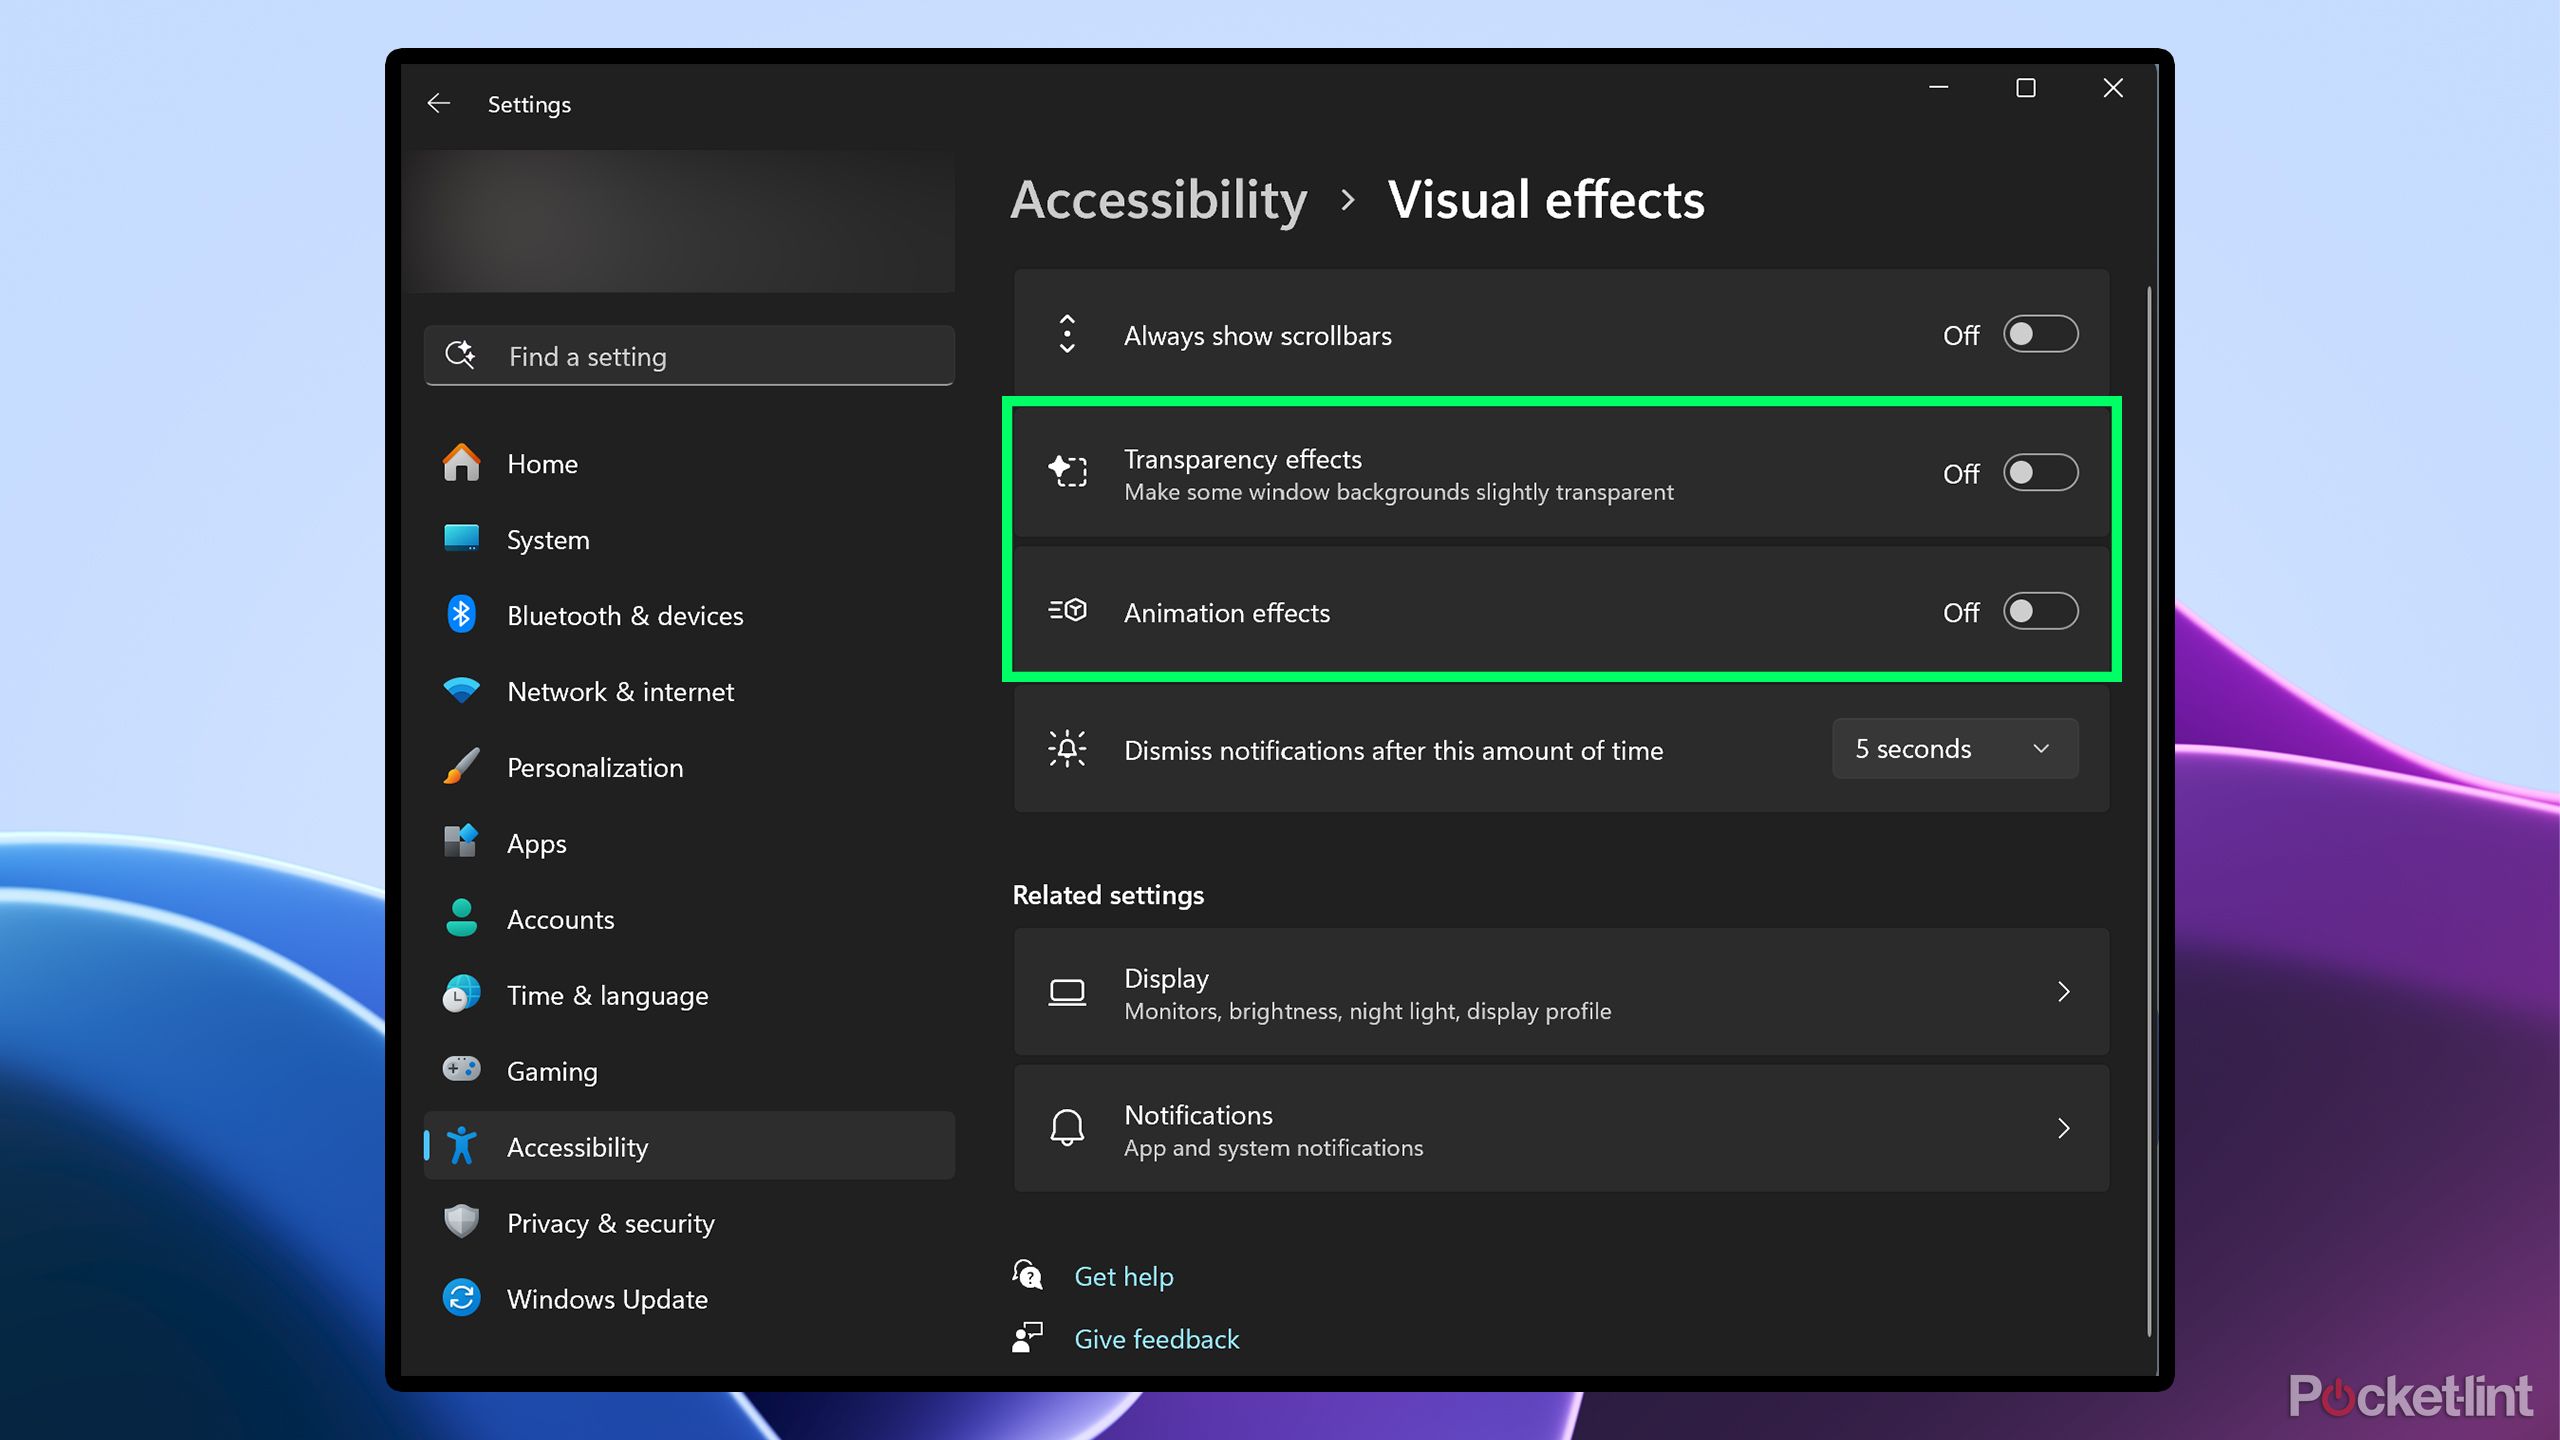
One incredibly easy way I improve my laptop’s battery life is by turning off visual effects on Windows. Not only does this help extend battery life, but it also makes Windows feel a bit snappier by eliminating animations and effects that occur when opening, closing, or minimizing a window. Additionally, you can turn off transparency effects, which further helps with battery life, since your PC won’t need to render those effects anymore.
To disable visual effects on Windows yourself, go to Settings > Accessibility > Visual Effects. From there, you can toggle off both Transparency Effects and Animation Effects.
For additional battery optimization, enter sysdm.cpl into the Windows search bar to access System Properties. From there, navigate to the Advanced tab and click on Performance. This opens a window where you can disable various Windows visual effects. The default setting is “Let Windows choose what’s best for my computer,” but I recommend changing it to “Adjust for better performance” for improved efficiency.
4
Reduce background activity
Free up system resources and save battery
Here’s a useful trick I recently discovered. While it involves navigating through several menus, I think it’s worth the effort for improved battery life. It’s called Background app permissions and it helps limit the background activity of apps on your PC. If you have many apps running in the background, this can lower their power usage and extend your battery life.
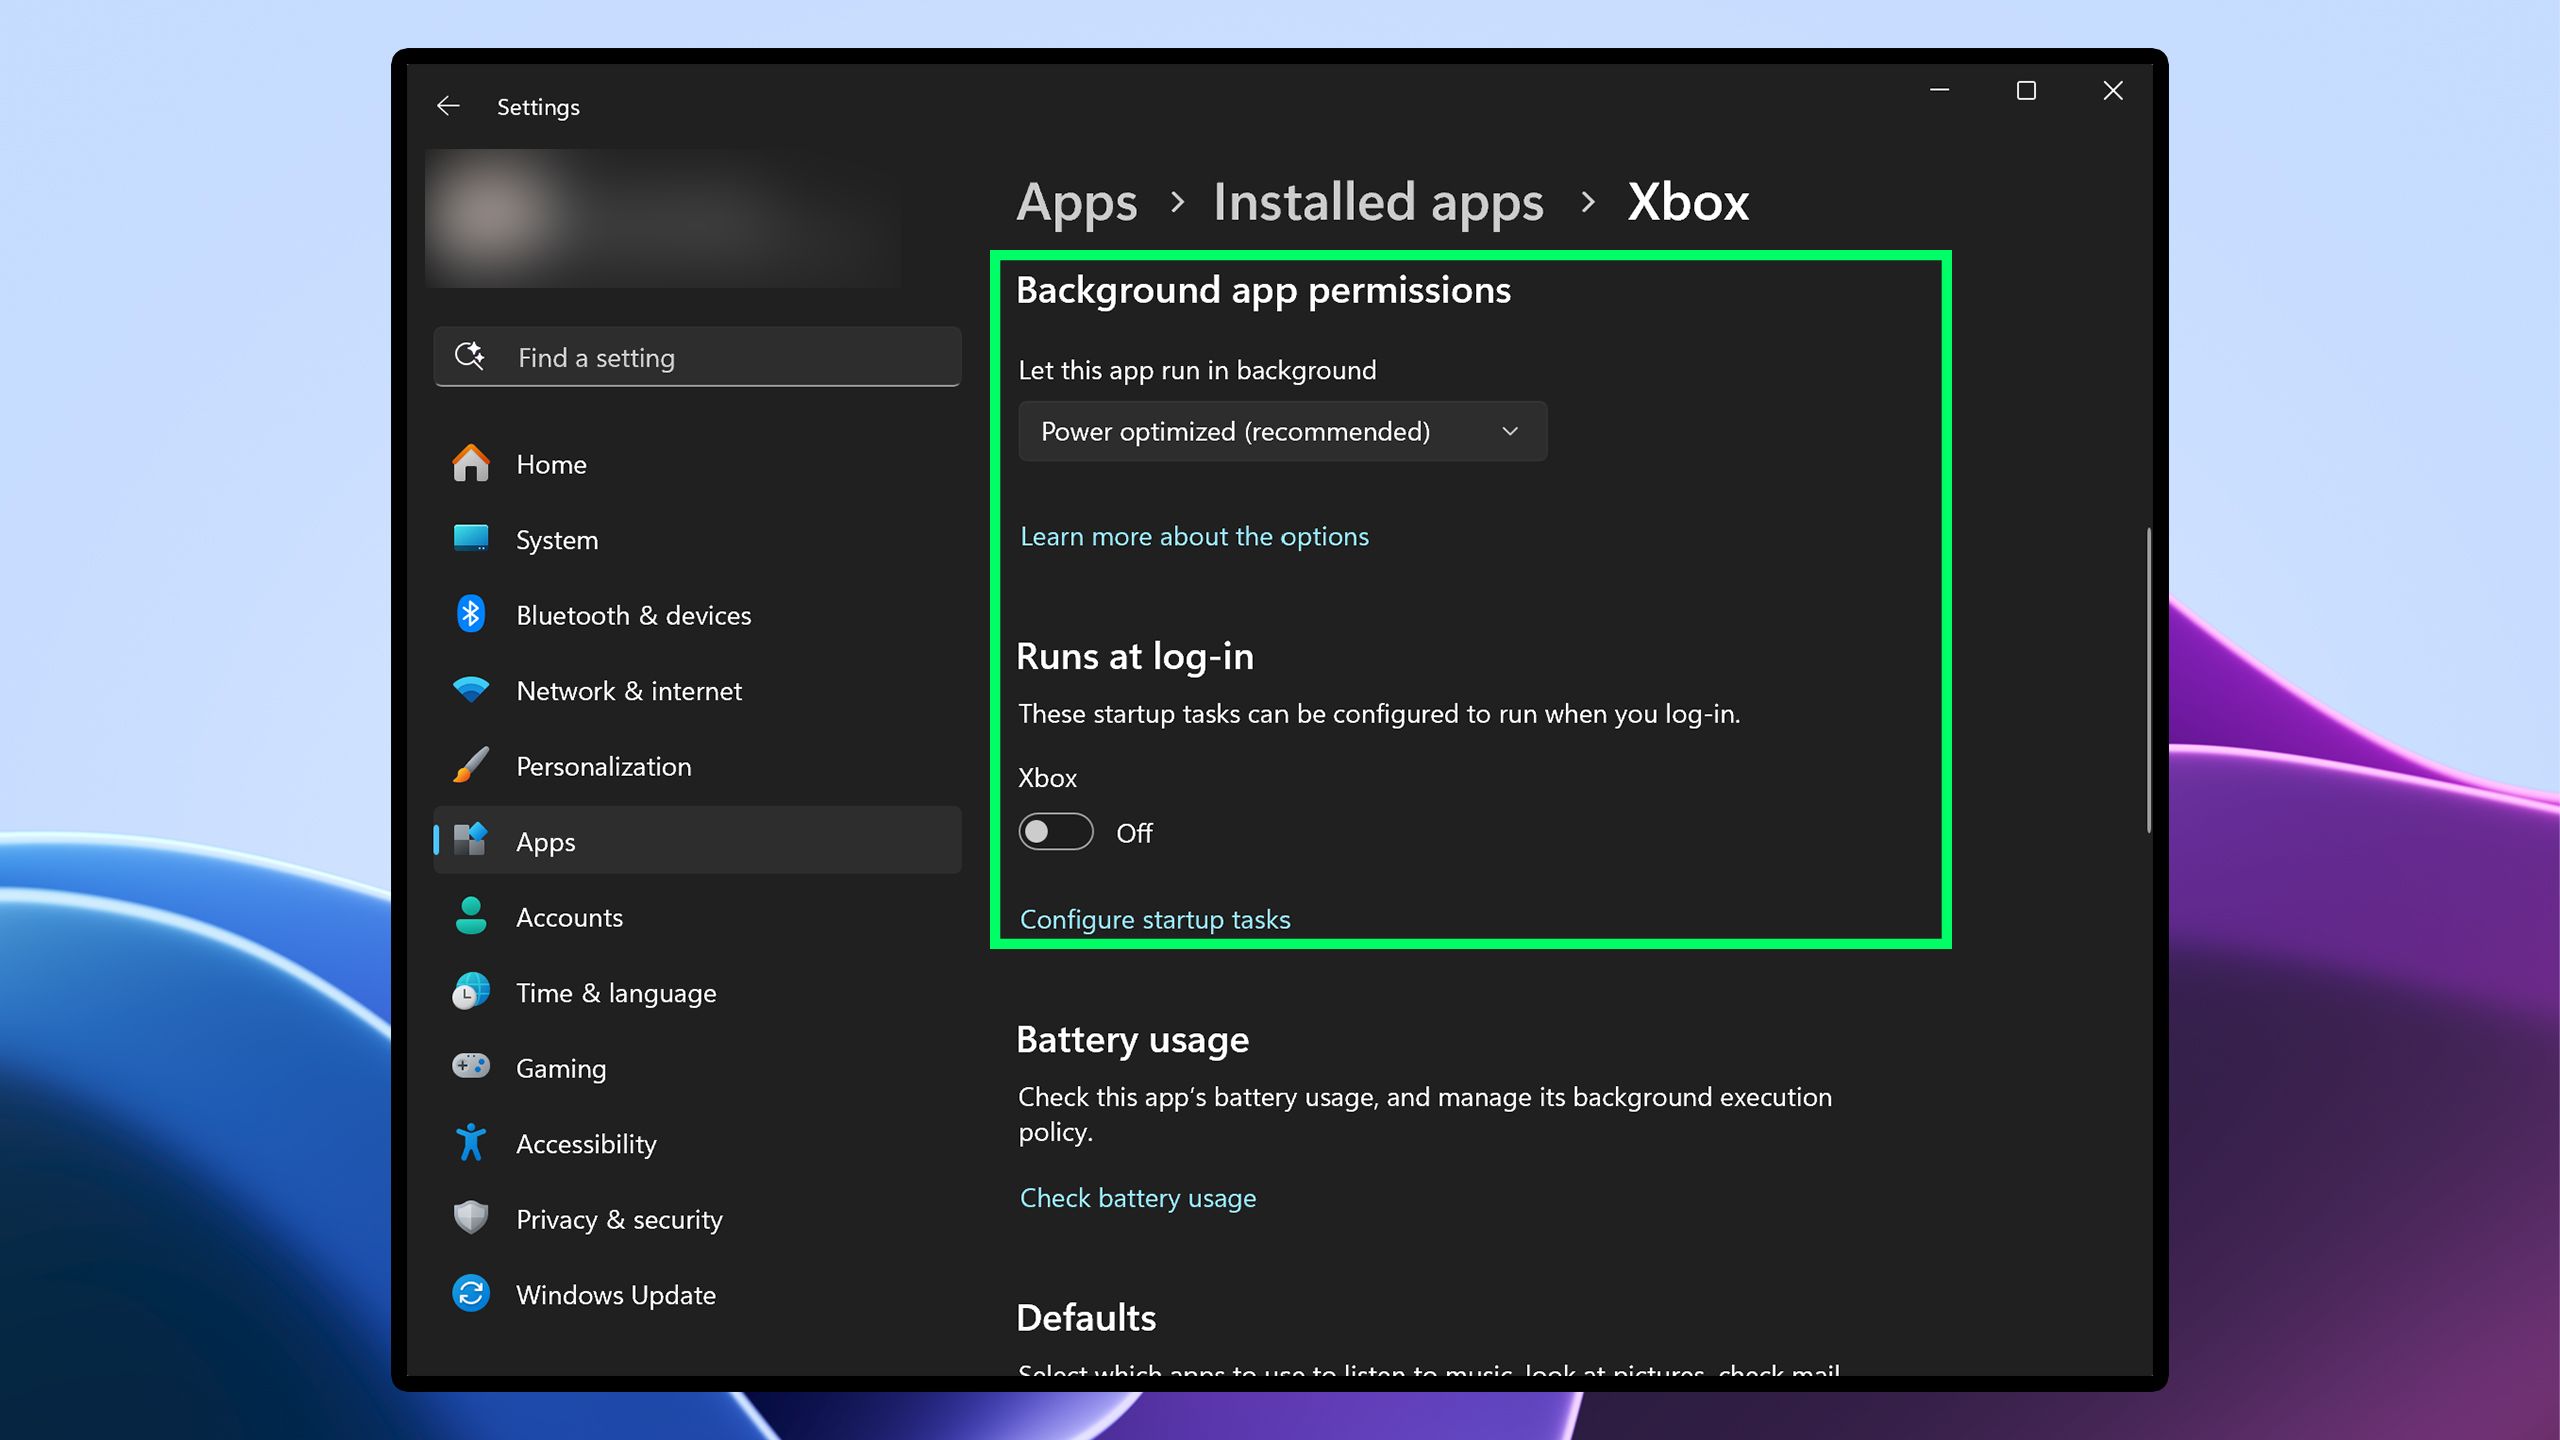
To do this, go to Settings > Apps > Installed Apps. From there, select any app you’ve installed by clicking the three dots next to its storage information. After clicking the dots, choose Advanced Options. This opens a menu (as shown in the image above), where you can adjust the app’s Background App Permissions. In the drop-down menu, you’ll see an option called Power optimized, which helps reduce the app’s power usage in the background.
Also, in the same menu, you can prevent the app from launching at startup by toggling off the Runs at log-in setting. If you don’t need the app running all the time, this is an easy way to stop it from starting automatically with Windows and free up system resources.
5
Adjust your timers and enable Energy Saver
Change the time it takes for your screen to turn off and your PC to enter sleep mode
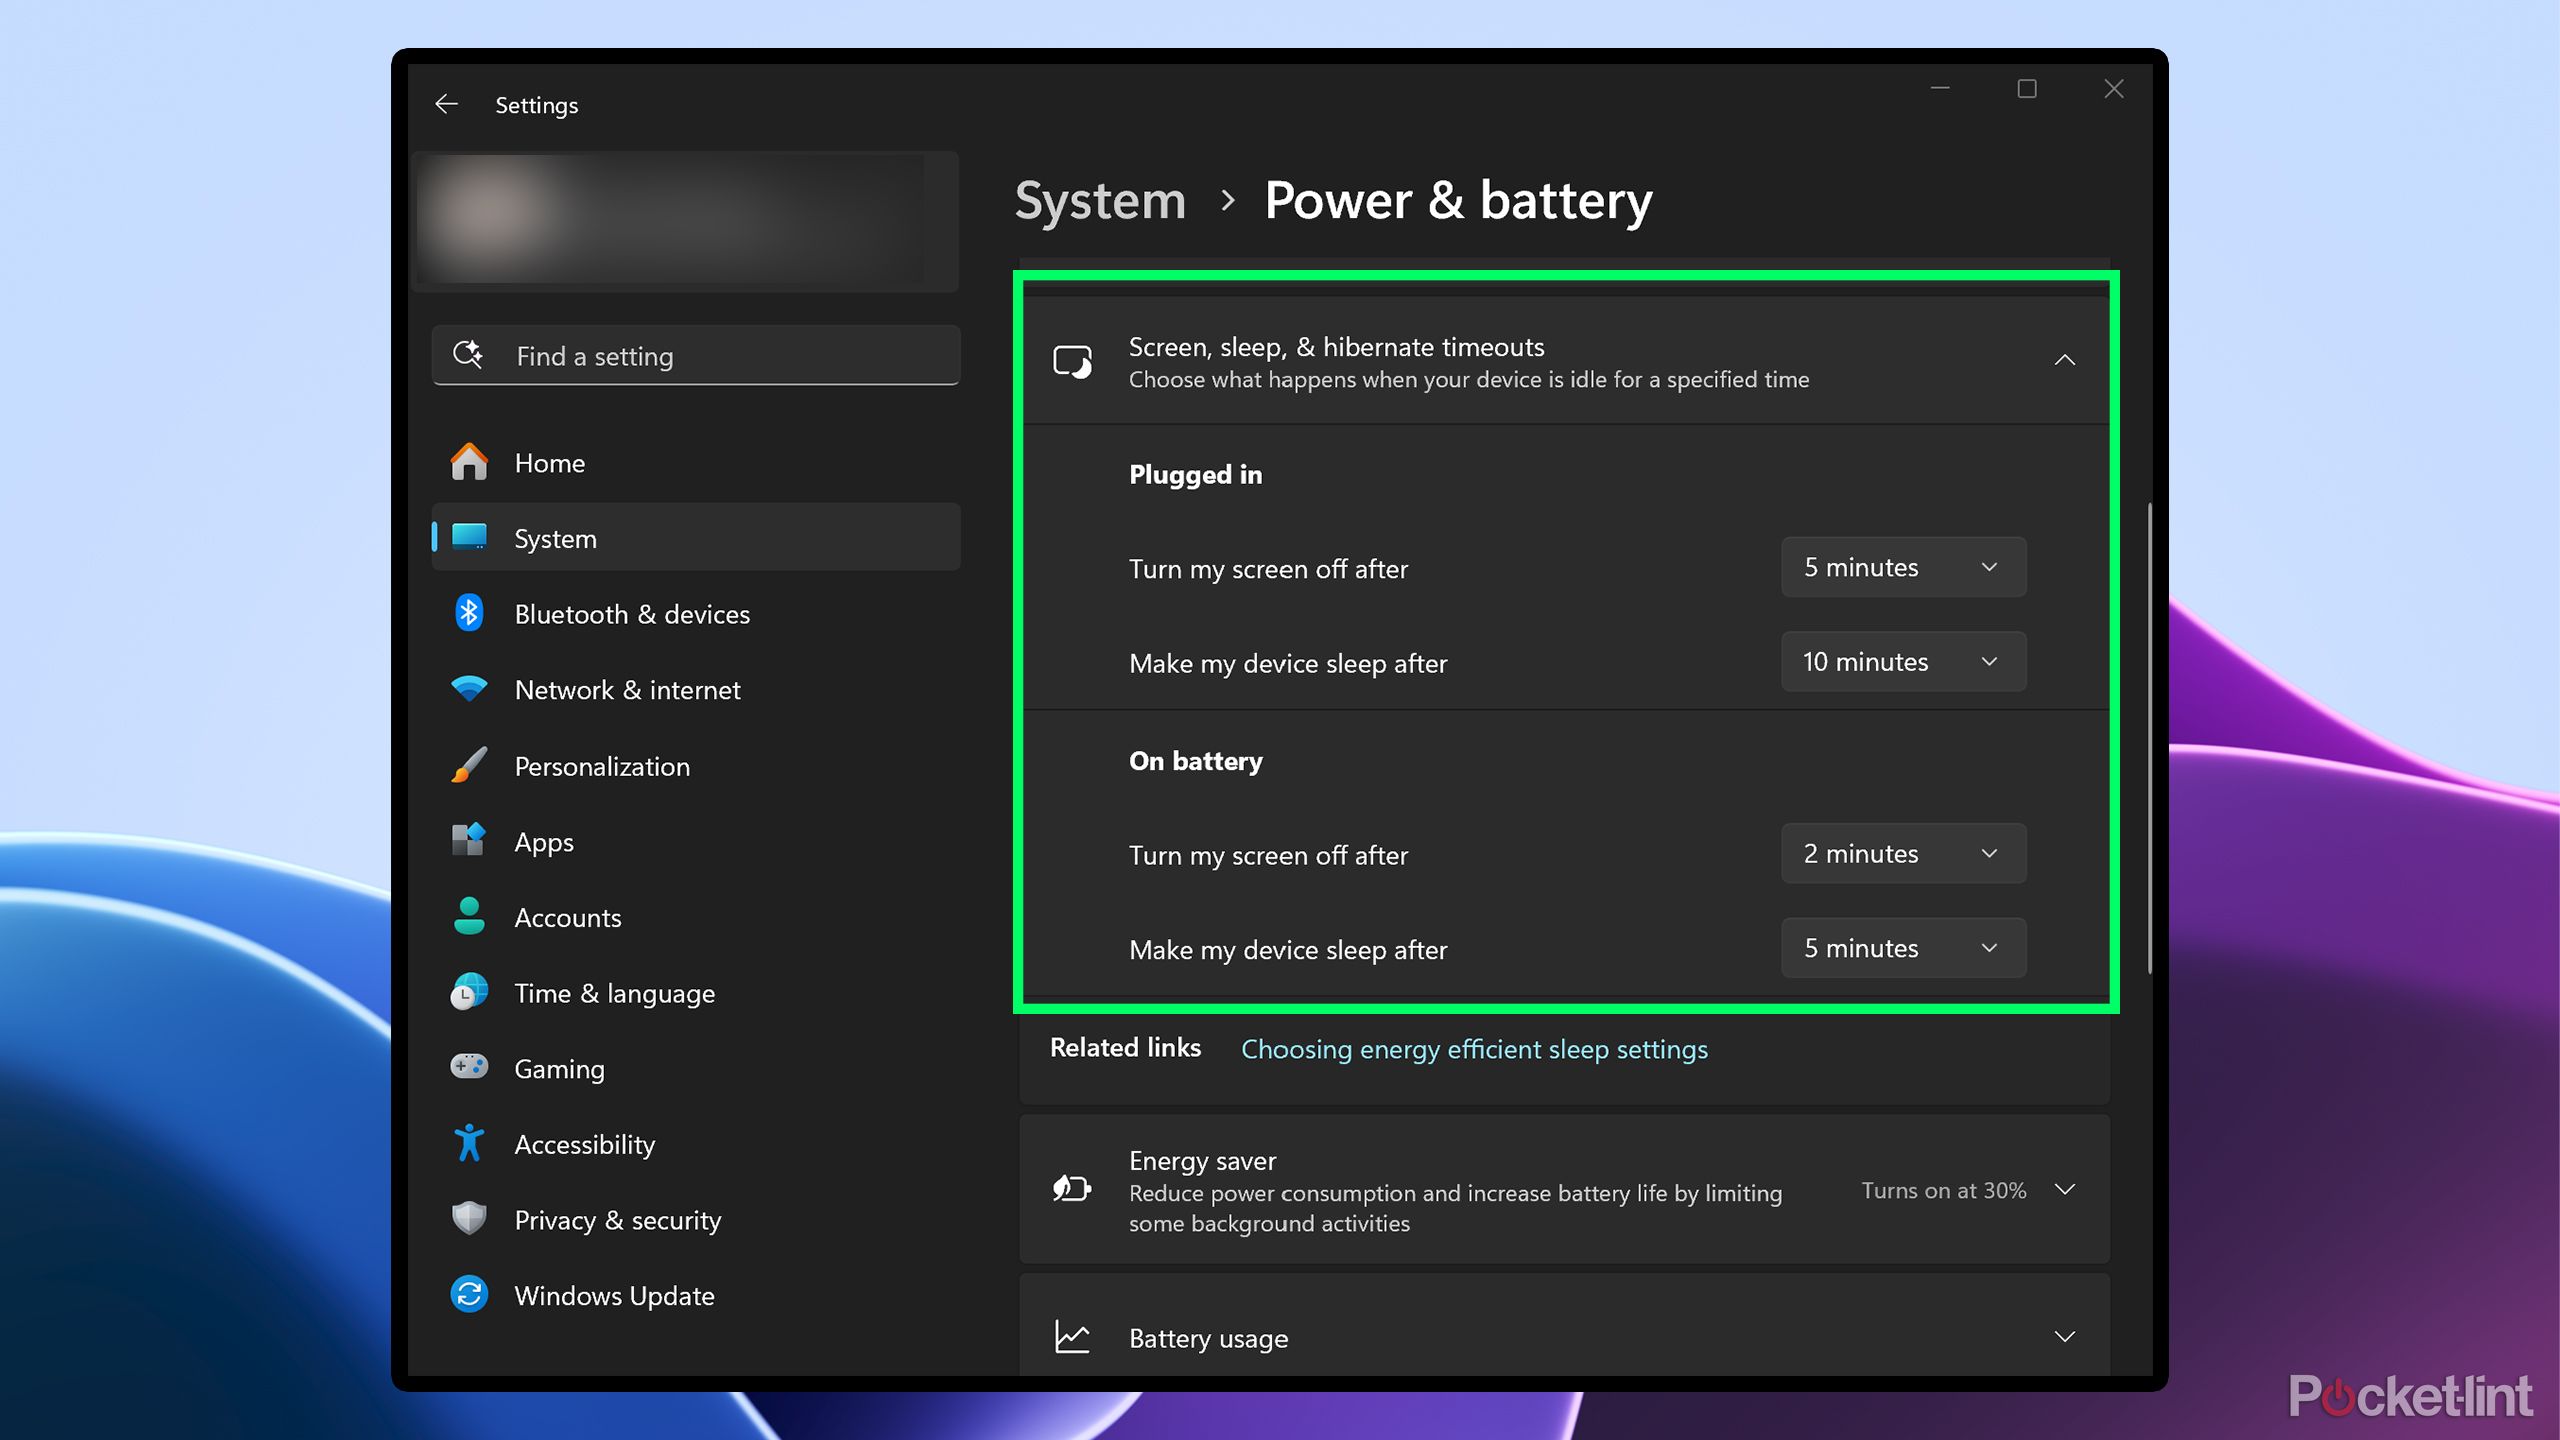
I have a bad habit of walking away from my laptop without closing the lid, which leaves the screen on and drains my battery. That’s why I recently took action and adjusted the screen off and sleep timers on my laptop to be more aggressive, meaning they turn off the screen or put my PC to sleep much faster. To do this, go to Settings > System > Power & Battery, then click on Screen, sleep & hibernate timeouts. From there, you’ll see options for how quickly your screen turns off and your PC enters sleep mode, whether it’s plugged in or on battery.
Personally, I set the times higher when my laptop is plugged in because that usually means I’m at my desk. But when it’s on battery, I lower the time before the screen shuts off and the PC goes to sleep significantly to extend battery life. Windows offers various options, but I personally set my screen to turn off after two minutes and my PC to sleep after five minutes, with my plugged-in values being double those. What you change it to depends on what you’re comfortable with, but I found those times worked best for me and helped me save battery.
Lastly, I have one final recommendation for improving battery life on Windows 11: manually enabling Energy Saver mode. Typically, this setting activates when your laptop’s battery drops to 20 or 30 percent. However, you can choose to enable it at any time to help reduce power consumption and increase battery life. To do this, you can go to Settings > System > Power & Battery > Energy saver or open the system tray on your taskbar in the bottom right and select toggle on Energy saver. I only recommend enabling this if you’re really in a pinch, as Energy saver can reduce system performance.
Trending Products

Basic Keyboard and Mouse,Rii RK203 ...

Samsung 27′ T35F Series FHD 1...

ASUS TUF Gaming A15 Gaming Laptop, ...

Cudy New AX3000 Twin Band Wi-Fi 6 R...

LG 24MP60G-B 24″ Full HD (192...

ASUS 27 Inch Monitor – 1080P,...

HP 17 Laptop, 17.3” HD+ Display, ...

Dell Inspiron 15 3000 3520 Business...

Sceptre 4K IPS 27″ 3840 x 216...


